
I think the Overexposed floor plates are a really well made product. And I have almost pulled the trigger on buying it a few times. Than I started thinking what can I use to make a home made version that would suit my needs.
This is what I came up with.
My "how to" floor plate I use for basketball. The first thing I will list all the pieces and parts you will need to make your own floor plate camera support. The size of my plate is only the size I chose to make mine. You may make it any size to suit your particular needs. Mine I choose to make it 7" x 11" this gave my a 6" spread in between cameras. So, it would not be over crowded with the pocket wizards. Now on to the list.
1) piece of 3/4 inch thick wood. I used 3/4" plywood and cut it to 7" x 11"

4) 1/4" fender washers. Can be found at Home Depot, Lowe's or your local hardware store. Pennies each, maybe .20¢ for all 4

Hex bolts - 1/4-20 for most ball heads - For Bogen/Manfrotto heads you will need 3/8-16 bolts. About a quarter a piece.
2) 3/4" for the hot shoe plates.
1) 2 1/2" for the shorter riser.
1) 6" for the longer riser.
If you want different size risers you will need a hex bolt 1" longer than the riser height.
For the risers I used 3/4" gas piping referred to as nipples. Also available at the same locations as the above items.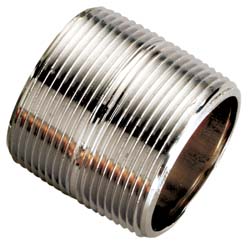
The shorter riser is a 1 1/2" nipple, also called a shoulder nipple. Maybe 2 bucks each

The higher riser is a 5" nipple. I chose the 5" because with the hex bolts most retail stores stock only up to a 6" bolt. And remember the hex bolt needs to be 1" longer than the riser. Around $3+ each.
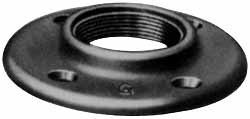
To hold the nipples in place and stabilize them I used flanges. You will need 2) 3/4" flanges. Found right next to the black pipe at the hardware stores. About 4 bucks a piece

For the ball heads I used Sunpak compact ball heads available @ B&H for $19.95 each I just had these laying around. So, that is what I used. These are rated for 4.2 pounds. I have not had any problems mounting a Canon xti with a 85 1.8 lens on them. Longer glass you might want to think about a different head. But. The great thing about these heads is, the head will recess in to the black pipe nipples and hold them in place nicely.

To mount the Pocket Wizard I used these adapters also from B&H for $6.95 each. I had 2 kickin' around.

These are called Nikon flash adapters. I use them in the Pocket Wizard's tripod socket to mount in the on to the plate so in case of any stay balls, players ect. the plastic foot on the PW's does not break. B&H also for $6.95 each. A small price to pay for the safety of the PW's. You'll need a set for each wizard if you choose to use them.
After I have the wood cut to size and drilled I used a black vinyl with a sticky back to cover up the top. This makes it have a nice finished look. I got this at Micheal's Craft Store for about 10 bucks. Also at Micheal's I got a 9" x 12" adhesive backed "Fun Foam" to place on the bottom to protect the basketball floors. This is .99¢

Here you can see I marked the wood in the center, both vertically and horizontally. For the holes I drilled using a 1 3/8" wood bit. And only drilled to a depth of 3/8". This is enough to insure the hex heads are recessed into the plate. To finish the holes I used a 1/4" bit and drilled the rest of the way through.

Here you can see how the hex heads and fender bolts are recessed in to the bottom of the wood.
For the risers I drilled 2 1/2" from the left and right sides. For the hot shoe mounts I drilled 1 1/2" from the top and bottom. Remember not to drill all the way through with the 1 3/8" bit only to a depth of 3/8". So, you'll have a nice 5/8" base.

As you can see I already installed the shoe mounts and the short riser. The white tubing I have covering the gas pipe is called pex tubing. It is not available in small quantities so I did not list it. But, if you have access to it, it is 1" aqua pex. I just think it adds a little finished look. Excuse the gaffers tape. This was already in use and I took it apart for example.

This is just to illustrate how you will be centering the flange with the 5" nipple after you screw the nipple in to the flange. Screw the nipple all the way in to the flange. Use a couple of pipe wrenches.

Now that you have tightened the nipple in to the flange you will have the bolt sticking out the top of the pipe slightly. Go ahead and screw the ball head on to the bolt. Tighten with a ratchet wrench.

Here is the completed floor plate. I wrapped a bit of gaffers tape to the taller riser so it is handy when needed.


Here are 2 views so you can get a good look on how the set-up is when I shoot.
Good luck and happy building.
If you would prefer to have me build you one let me know and we can discuss a price depending on you specific needs.
Monday, January 26, 2009
How-To instructions on a camera floor plate
Saturday, January 24, 2009
Images puplished in DC papers.
 I got some contact information through a local reporter covering the Army/Navy basketball games for a paper in Maryland. After a series of e-mails they will be using several of my images in the Capital Gazette. It will not be the first time I have had images in the newspapers. But, anytime you can get you name out there in the papers being a new business is a good thing.
For tomorrows game I will be mounting a camera above the shot clock again for a unique view of the game. Hopefully images like the ones I get through my remote cameras will begin to make a name for me. If time allots I will be getting some images of my set-up and posting them here to share.
Sunday, January 18, 2009
Goal-Cam got wrecked tonight
 But, not before capturing this image.
I had to pull the camera out of the net and make some quick repairs to the housing in time to get it back into the net for the 3rd period. I scurried around to get some duct tape (man I love that stuff) With in a few minutes I had the housing all taped up and ready to go for round three. I really didn't have the time I needed to make all the adjustments to the camera and make sure the angle was good. But, I did come up with some good pictures in the third period. So it was worth the effort. The housing has taken quite the beating the year. But has stood up remarkably well.
Thursday, January 15, 2009
Making the best of a remote camera set-up
 I think the best way to make use of a remote camera set-up is to make some sort of composite image combining 2 of the images captured at the same time from 2 separate angles. This images 1 was captured from a remote camera mounted above the shot clock. The inset image was captured with a camera I was hand-holding and triggering the remote camera via Pocket Wizards.
The one thing to remember most importantly when using remote camera all precautions should be taken to insure to prevent cameras from falling. Please remember to use safety cables on all equipment mounted above playing surfaces or other areas. Not only will this safeguard your equipment. But, if any mountings or supports should fail safety cables will prevent equipment from falling on to spectators or players.
Saturday, January 10, 2009
Goal-Cam is really starting to shine
 This image was taken with my goal-cam. Owen Meyer of Army gets one in between the legs of Mercyhurst's Ryan Zapolski to score what turned out to be the game winning goal.
 This is the view from my vantage point. Luckily, I have the cameras time synced up pretty close so I am able to match images from several different cameras fairly easily.
Thursday, January 1, 2009
Good use of remote camera
 This is a set of images I was able to capture using a hand-held camera, as well as, a remote camera. For this I was shooting with a wide angle lens setup on my remote camera. The camera was placed on a tabletop tripod placed next to me on the floor. For the inset shot I was shooting with my 70/200 f/2.8. Again this is just 1 more option for shooting with remote cameras.
Here is a video that I used when I first started looking in to remote shooting.
Thanks, PShizzy.com
Subscribe to:
Posts (Atom)

